
Spring REST Docs
Spring REST Docs의 목적은 RESTful 서비스에 대한 정확하고 읽기 쉬운 문서를 작성하는 데 도움을 주고 테스트 코드를 통한 문서를 자동으로 생성해 줍니다. 기본적으로 Asciidoctor를 사용해 문서를 작성합니다.
Asciidoctor는 일반 텍스트를 처리하여 사용자의 필요에 맞게 스타일과 레이아웃이 적용된 HTML을 생성합니다.
많이 사용하는 API 문서화 도구에는 Spring REST Docs와 Swagger가 있습니다. 둘 중에 Spring REST Docs를 사용한 이유는 다음과 같습니다.
Swagger는 설정 및 사용 방법이 비교적 쉽고 "Postman"과 같이 문서에서 직접 요청을 보내 응답 값을 확인할 수 있습니다. 하지만 Swagger의 경우 제품 코드에 작성하면서 코드의 가독성이 아주 많이 떨어집니다. 또한 테스트 기반 접근 방식이 아니기 때문에 서비스 문서의 정확성을 보장해주지 않습니다.
그에 반해 Spring REST Docs는 테스트 기반 접근 방식으로 서비스 문서의 정확성을 보장하고 제품 코드에 영향을 주지 않습니다. 대신에 Swagger보다 설정 및 사용 방법이 어려운 편입니다.
저의 개인적인 의견으로는 Spring REST Docs이 문서화 형식에 더 가깝지 않나 싶습니다. 제품 코드에 영향을 주지 않으면서 반드시 테스트 코드를 작성해야 한다는 것과 정확성을 보장한다는 이러한 이유 등으로 사용하게 됐습니다.
| Spring REST Docs | Swagger | |
| 장점 | 제품 코드에 영향이 없다 | API를 테스트해볼 수 있다 |
| 테스트가 성공해야 문서가 작성된다(정확성 보장) | 적용이 비교적 쉽다 | |
| 단점 | 설정이 어렵다 | 제품 코드에 추가해야 한다 |
| 필드에 따라 테스트 코드의 양이 많아질 수 있다 | 정확성 보장하기 어렵다 |
Spring REST Docs 작성
Gradle Build 구성
Spring REST Docs를 사용하기 위해서는 플러그인, 종속성 및 task를 구성해야 합니다.
plugins { // (1)
	id "org.asciidoctor.jvm.convert" version "3.3.2"
}

configurations {
	asciidoctorExt // (2)
}

dependencies {
	asciidoctorExt 'org.springframework.restdocs:spring-restdocs-asciidoctor' // (3)
	testImplementation 'org.springframework.restdocs:spring-restdocs-mockmvc' // (4)
}

ext { // (5)
	snippetsDir = file('build/generated-snippets')
}

test { // (6)
	outputs.dir snippetsDir
}

asciidoctor { // (7)
	inputs.dir snippetsDir // (8)
	configurations 'asciidoctorExt' // (9)
	dependsOn test // (10)
}

bootJar {
    dependsOn(tasks.named('asciidoctor')) // (11)
    from("${asciidoctor.outputDir}") { // (12)
        into 'static/docs' // (13)
    }
}- Gradle에서 Asciidoctor 플러그인을 사용하겠다는 선언입니다. .adoc 포맷의 문서를 HTML, PDF 등의 포맷으로 변환해 주는 플러그인입니다.
- 종속성 구성인 asciidoctorExt를 생성합니다.
- spring-restdocs-asciidoctor에 대한 종속성을 추가합니다. 이렇게 하면 .adoc 파일에서 사용할 스니펫 속성이 자동으로 구성되어 build/generated-snippets를 가리킵니다.
- spring-restdocs-mockmvc에 대한 종속성을 추가합니다. 만약 WebTestClient or REST Assured를 사용하려면 spring-restdocs-mockmvc 대신에 spring-restdocs-webtestclient or spring-restdocs-restassured를 추가하면 됩니다.
- build/generated-snippets 디렉터리는 테스트 결과로 생성되는 스니펫 파일(.adoc 조각들)이 저장되는 위치로 변수에 저장합니다.
- test 작업을 실행했을 때 snippetsDir에 결과를 생성한다는 것을 Gradle에 알려줍니다.
- aciidoctor에 대한 작업을 구성합니다.
- 테스트 결과로 생성된 .adoc 조각들을 문서로 통합하기 위해 읽어옵니다.
- 위에서 정의한 asciidoctorExt 구성에 있는 종속성을 작업에서 사용한다고 명시합니다. 이 설정이 있어야 커스텀 블록 매크로(operation::) 등을 사용할 수 있습니다.
- asciidoctor 작업은 test 작업이 먼저 실행된 다음에 실행이 됩니다. 문서를 만들기 위해서는 테스트를 실행해서 스니펫을 생성해야 하므로, 종속 관계를 명시하는 것입니다.
- bootJar 작업은 jar 파일을 생성하는데 asciidoctor 작업이 먼저 실행된 후 실행됩니다. 문서 생성이 끝난 다음에 jar 파일을 생성하도록 합니다.
- Asciidoctor 출력 디렉터리에서 파일들을 가져옵니다. ${buildDir}/docs/asciidoc 경로에 있는 HTML 문서들입니다.
- 생성된 문서들을 프로젝트의 jar 파일에 패키징 합니다. static/docs 경로에 복사됩니다.
위와 같이 구성하면 생성된 문서는 jar에 포함되서 프로젝트에서는 확인할 수 없습니다.
jar 내부에만 포함되어 있기 때문에 다음과 같은 명령어로 확인할 수 있습니다.
jar -tf build/libs/*.jar | grep static/docs
프로젝트 내부에 포함시키기 위해서는 복사하는 작업을 별도로 추가해야 하는데 다음과 같습니다.
asciidoctor {
    inputs.dir snippetsDir
    configurations 'asciidoctorExt'
    dependsOn(tasks.named('test'))
}

tasks.register('copyApiDocs', Copy) {
    dependsOn asciidoctor
    doFirst {
        delete file('src/main/resources/static/docs')
    }
    from asciidoctor.outputDir
    into file('src/main/resources/static/docs')
}

bootJar {
    dependsOn(tasks.named('copyApiDocs'))
    from("${asciidoctor.outputDir}") {
        into 'static/docs'
    }
}
copyApiDocs로 명칭으로 정의하고 "Copy" 작업을 등록해 줍니다. doFirst로 폴더가 존재하면 삭제하고 다시 생성해 줍니다.
asciidoctor 출력 디렉터리에 있는 파일들을 into로 해당 경로에 복사합니다.
JUnit 5 테스트 설정
test/**/RestDocsSupport.java
@ExtendWith(RestDocumentationExtension.class)
public abstract class RestDocsSupport {

    protected MockMvc mockMvc;
    protected ObjectMapper objectMapper = new ObjectMapper();

    @BeforeEach
    void setUp(final RestDocumentationContextProvider provider) {
        mockMvc = MockMvcBuilders.standaloneSetup(initController())
                .apply(documentationConfiguration(provider))
                .build();
    }

    protected abstract Object initController();
}
Spring REST Docs 테스트 환경의 공통 설정을 재사용하도록 추상 클래스를 만들어줍니다.
@ExtendWith(RestDocumentationExtension.class)은 테스트 실행 시에 RestDocumentationContextProvider를 통해 문서화에 필요한 컨텍스트를 전달하는 역할을 합니다.
MockMvc를 standalone 모드로 등록해서 실제 Spring Context를 띄우지 않도록 하고 initController() 추상 메서드로 구현 클래스에서 테스트 대상 컨트롤러를 정의합니다.
RESTful 서비스 호출
public class ProductControllerDocsTest extends RestDocsSupport {

    private final ProductService productService = mock(ProductService.class);

    @Override
    protected Object initController() {
        return new ProductController(productService);
    }

    @DisplayName("신규 상품을 등록하는 API")
    @Test
    void createProduct() throws Exception {
        final ProductCreateRequest request = ProductCreateRequest.builder()
                .type(ProductType.HANDMADE)
                .sellingStatus(ProductSellingStatus.SELLING)
                .name("아메리카노")
                .price(4000)
                .build();

        given(productService.createProduct(any(ProductCreateServiceRequest.class)))
                .willReturn(ProductResponse.builder()
                        .id(1L)
                        .productNumber("001")
                        .type(ProductType.HANDMADE)
                        .sellingStatus(ProductSellingStatus.SELLING)
                        .name("아메리카노")
                        .price(4000)
                        .build());

        mockMvc.perform(post("/api/v1/products/new")
                        .contentType(MediaType.APPLICATION_JSON)
                        .content(objectMapper.writeValueAsString(request))
                )
                .andDo(print())
                .andExpect(status().isOk())
                .andDo(document("product-create",
                        preprocessRequest(prettyPrint()),
                        preprocessResponse(prettyPrint()),
                        requestFields(
                                fieldWithPath("type").type(JsonFieldType.STRING)
                                        .description("상품 타입"),
                                fieldWithPath("sellingStatus").type(JsonFieldType.STRING)
                                        .description("상품 판매상태"),
                                fieldWithPath("name").type(JsonFieldType.STRING)
                                        .description("상품 이름"),
                                fieldWithPath("price").type(JsonFieldType.NUMBER)
                                        .description("상품 가격")
                        ),
                        responseFields(
                                fieldWithPath("code").type(JsonFieldType.NUMBER)
                                        .description("코드"),
                                fieldWithPath("status").type(JsonFieldType.STRING)
                                        .description("상태"),
                                fieldWithPath("message").type(JsonFieldType.STRING)
                                        .description("메시지"),
                                fieldWithPath("data").type(JsonFieldType.OBJECT)
                                        .description("응답 데이터"),
                                fieldWithPath("data.id").type(JsonFieldType.NUMBER)
                                        .description("상품 ID"),
                                fieldWithPath("data.productNumber").type(JsonFieldType.STRING)
                                        .description("상품 번호"),
                                fieldWithPath("data.type").type(JsonFieldType.STRING)
                                        .description("상품 타입"),
                                fieldWithPath("data.sellingStatus").type(JsonFieldType.STRING)
                                        .description("상품 판매상태"),
                                fieldWithPath("data.name").type(JsonFieldType.STRING)
                                        .description("상품 이름"),
                                fieldWithPath("data.price").type(JsonFieldType.NUMBER)
                                        .description("상품 가격")
                        )
                ));
    }
}
테스트 코드에서 .andDo(document(...))로 서비스 호출을 문서화해 스니펫이 작성됩니다.
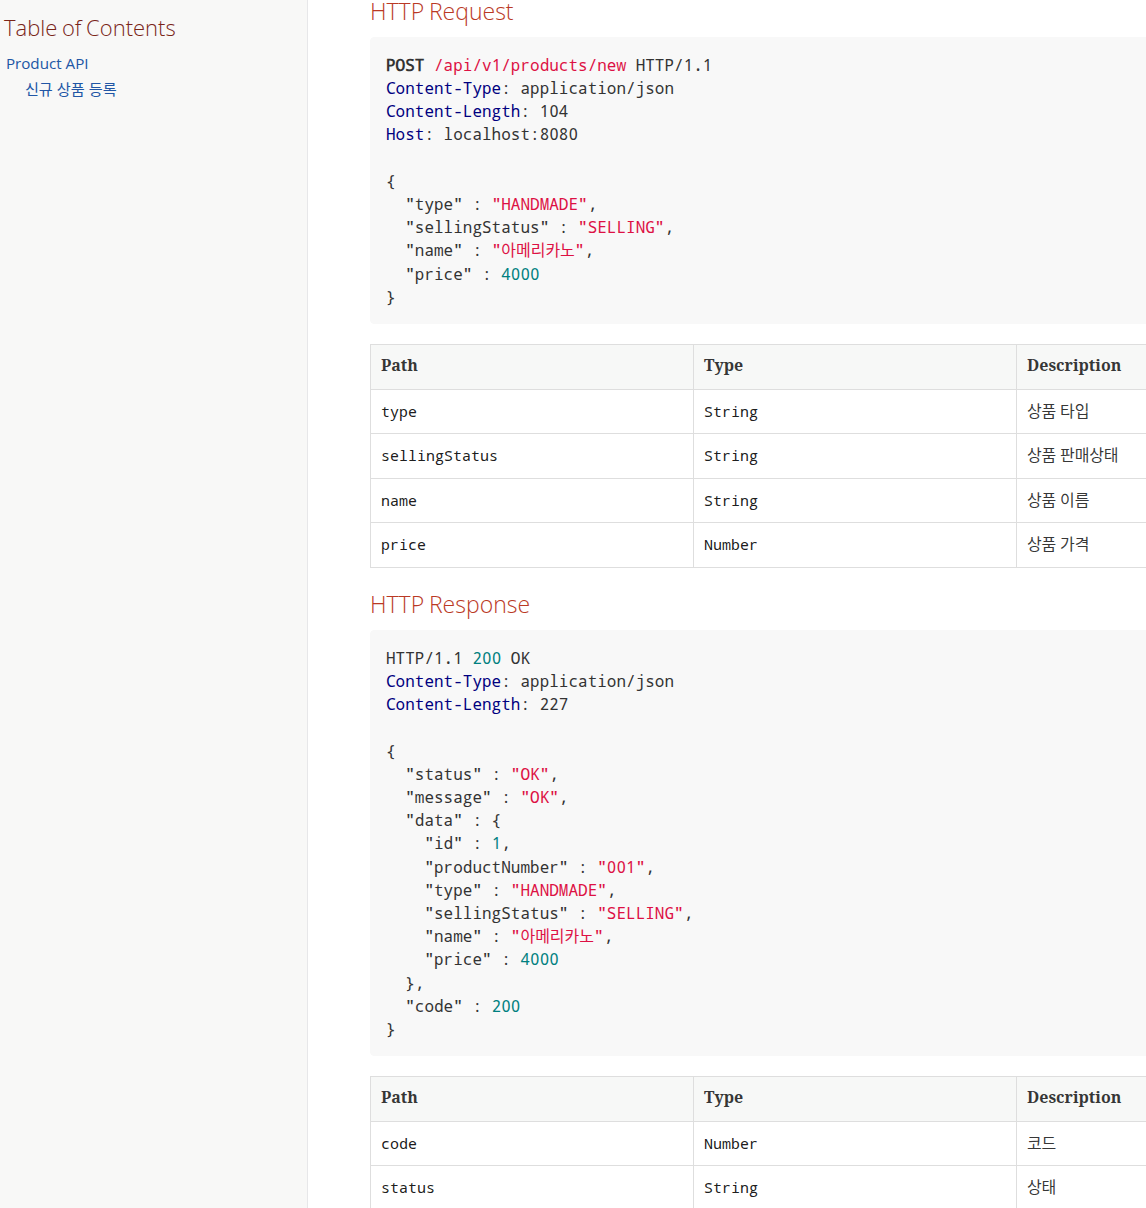
document("product-create",...) 첫 번째 파라미터는 구성된 출력 디렉터리 하위에 "product-create"명으로 디렉터리를 만들고 스니펫을 작성하게 됩니다. 즉, build/generated-snippets/product-create/*.adoc 파일들이 생기게 됩니다.
preprocessRequest & Response(prettyPrint())는 문서화되어 있는 요청과 응답의 json 값을 예쁘게 정렬돼서 출력해 주도록 합니다. requestFields, responseFields, pathParameters 등으로 요청과 응답 값을 표현할 수 있습니다.

asciidoctor 종속성을 추가했으면 gradle documentation Task가 추가되어 있고 하위에 asciidoctor를 실행하면 build/generated-snippets/product-create/*.adoc 파일들이 생긴 것을 확인할 수 있습니다. 이 *.adoc 파일들로 문서화를 할 수 있습니다.
스니펫 사용(adoc)
프로젝트 src 하위에 docs/asciidoc 디렉터리를 생성하고 index.adoc 파일을 생성해 줍니다. src/docs/asciidoc/index.adoc
// index.adoc
// (1)
ifndef::snippets[]
:snippets: ../../build/generated-snippets
endif::[]

= REST API 문서
// (2)
:doctype: book
:icons: font
:source-highlighter: highlightjs
:toc: left
:toclevels: 2
:sectlinks:

[[Product-API]]
== Product API

[[product-create]]
=== 신규 상품 등록

==== HTTP Request
// (3)
include::{snippets}/product-create/http-request.adoc[]
include::{snippets}/product-create/request-fields.adoc[]

==== HTTP Response
include::{snippets}/product-create/http-response.adoc[]
include::{snippets}/product-create/response-fields.adoc[]- ifndef::snippets[]는 snippets 변수가 정의되지 않았을 경우 경로를 지정한 설정입니다.
- 문서화 화면에 대한 설정 부분입니다.
- doctype을 book으로 지정하면 asciidoc은 문서를 책 형식으로 출력합니다.
- icons을 font로 지정하면 아이콘 스타일을 폰트 아이콘으로 처리합니다.
- source-highlighter는 소스 코드 하이라이팅을 위한 설정인데 highlightjs를 사용해 하이라이팅 됩니다.
- toc는 목차 위치를 설정하는 것으로 왼쪽에 배치됩니다.
- toclevels는 목차의 깊이를 설정하는데 2단계까지의 제목만 목차에 표시됩니다.
- sectlinks는 섹션 링크를 활성화합니다.
- [[...]]는 목차 링크를 생성합니다.
- include:: 구문은 다른 Asciidoc 파일을 포함하는 역할을 하는데 앞서 지정한 snippets 경로에 생성된 문서화 조각을 포함하게 됩니다.
도메인별 *.adoc 파일을 생성해서 하나로 합치려고 하면 다음과 같이 할 수도 있습니다.
build.gradle
asciidoctor {
    inputs.dir snippetsDir
    configurations 'asciidoctorExt'
    sources {   // 하나의 index.html 파일만 생성되도록 지정
        include("**/index.adoc")
    }
    baseDirFollowsSourceFile() // 다른 adoc 파일을 include할 때 경로를 baseDir로 맞춘다.
    dependsOn test
}
src/docs/asciidoc/index.adoc
ifndef::snippets[]
:snippets: ../../build/generated-snippets
endif::[]

= REST API 문서
:doctype: book
:icons: font
:source-highlighter: highlightjs
:toc: left
:toclevels: 2
:sectlinks:

[[Product-API]]
== Product API

include::api/product/product.adoc[]
src/docs/asciidoc/api/product/product.adoc
[[product-create]]
=== 신규 상품 등록

==== HTTP Request
include::{snippets}/product-create/http-request.adoc[]
include::{snippets}/product-create/request-fields.adoc[]

==== HTTP Response
include::{snippets}/product-create/http-response.adoc[]
include::{snippets}/product-create/response-fields.adoc[]
커스텀 스니펫 사용
요청, 응답 등 필드 값이 필수적일 수 있거나 필수가 아닌 필드들도 있을 수 있습니다. 해당 optional을 표시해 주기 위해 커스텀 스니펫을 만들어서 사용할 수 있습니다.
test 하위에 resources 하위 다음과 같은 폴더들을 생성합니다.
test/resources/org/springframework/restdocs/templates
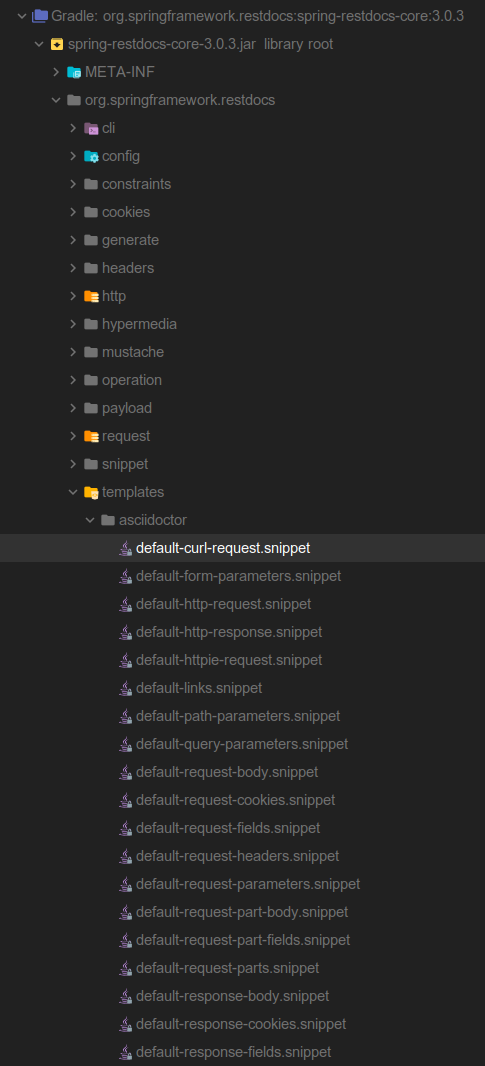
Spring REST Docs 다운로드한 종속성을 확인해 보면 기본 스니펫을 사용하는 경로를 확인할 수 있습니다. 이에 맞춰 디렉터리를 생성했습니다. "test/resources/org/springframework/restdocs/templates"
그러면 templates 하위에 "request-field.snippet", "response-field.snippet" 파일을 생성합니다.
==== Request Fields
|===
|Path|Type|Optional|Description

{{#fields}}

|{{#tableCellContent}}`+{{path}}+`{{/tableCellContent}}
|{{#tableCellContent}}`+{{type}}+`{{/tableCellContent}}
|{{#tableCellContent}}{{#optional}}true{{/optional}}{{^optional}}false{{/optional}}{{/tableCellContent}}
|{{#tableCellContent}}{{description}}{{/tableCellContent}}

{{/fields}}

|===
Request, Response의 내용은 동일하고 첫 줄 제목만 내용에 맞게 적어주면 됩니다.
기존에 있던 path, type, description 외에 optional을 추가했습니다.
.andDo(document("product-create",
                        preprocessRequest(prettyPrint()),
                        preprocessResponse(prettyPrint()),
                        requestFields(
                                fieldWithPath("type").type(JsonFieldType.STRING)
                                        .description("상품 타입"),
                                fieldWithPath("sellingStatus").type(JsonFieldType.STRING)
                                        .optional()
                                        .description("상품 판매상태"),
                                fieldWithPath("name").type(JsonFieldType.STRING)
                                        .description("상품 이름"),
                                fieldWithPath("price").type(JsonFieldType.NUMBER)
                                        .description("상품 가격")
                        )
		...
		));
optional을 표시하기 위해 기존 코드에서 .optional()을 추가한 것을 볼 수 있습니다.
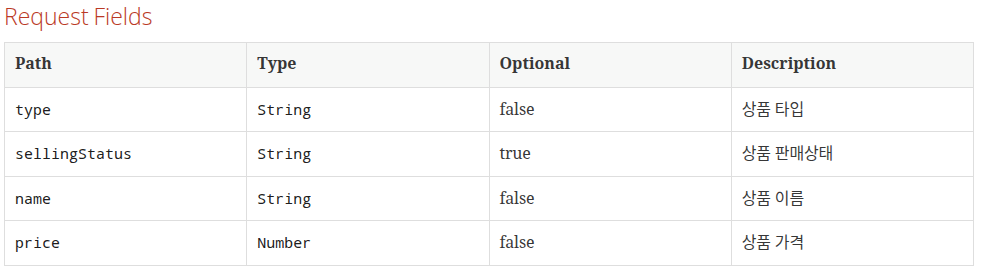
이미지와 같이 표에 Optional이 추가되면서 필수 값과 필수가 아닌 값을 확인할 수 있습니다.
그리고 더 다양하게 커스텀할 수 있습니다.
🔗 Reference
'spring' 카테고리의 다른 글
| [Spring] 인터셉터(Interceptor) 적용 (0) | 2022.04.17 |
|---|---|
| JPA @MappedSuperclass (0) | 2022.03.07 |
| JUnit @Before & @After (0) | 2022.03.07 |
| Spring Boot 자동 환경 설정 (0) | 2021.04.10 |


